ShareThis

Friday, February 25, 2011

Tripod for Macro

This post is about tripod for macro photography.

I was out looking for bugs again when I found this newly emerged cicada perching on its own exuvium, pumping fluids to its wings, waiting for its body to harden before taking its first flight! I spent the next one hour photography this cicada.

I believe I missed the emergence process by about 10 to 15 minutes. Better luck next time! The newly emerged cicada was about 5 inches from the ground, on the root of a tree. So i lowered my tripod. My cheap tripod, which cost me RM200 ( about 65 USD), could go quite low, if it wasn't for the centre column which gets in the way.

But I really wanted to get low enough so I could shoot from an angle which maximizes my DOF. A light bulb lit up in my head and I found myself a blunt, dry tree branch on the forest floor and started digging!  Ah..i forgot to include dry tree branch i used for digging in this pic. :D.

macro tripod 17-02-11_1320 copy copy

A closer look. Tripod brand name removed. I probably should start carrying a spade in my backpack. I wonder if there is a foldable spade:D. Although I managed to get quite low, it still wasn't as low as I would have liked. The next time you see holes and earth all dug up, it may not be the work of the wild boars.
tripod for macro photography 17-02-11_1328 copy

And then Derrick suggested an idea - fold up the tripod and put it on the ground, like this:
tripod for macro photography 17-02-11_1350 copy

Excellent. Now we could get really really low!

I can't show you the actual shot from this session yet but I have a somewhat similar shot I took back in November 26, 2007 - my first sighting of an newly emerged cicada. Same type of cicada, same park. Same "a few minutes too late" :(

newly emerged cicada DSC_8781

You don't have to go through all this trouble though if you are willing to spend some money on the right tripod. I have seen one where the center column can be removed. Beanbag is also another idea, if you don't mind an additional 400 gram or so in your backpack.

Wednesday, February 16, 2011

Cheap Macro

If you want to try out macro but not willing yet to fork out good money for a real macro lens until you are really sure that macro is for you, then this post is for you.

Depending on what lenses you already have, one of these options should work for you. Approximate prices indicated for reference.

1. Raynox DCR250


This is a +8 diopter lens that you can snap onto your existing lens in order to achieve higher magnification. It works on lens (any brands!) with filter size from 52mm to 67mm. You will get higher magnification on the tele end only though. A 50-200 or 50-250 tele lens should work great with the DCR250.

At 200mm end, the DCR250 will give you approximately 200mm/ 125 = 1.6:1 magnification.

To calculate the magnification gained, you divide the focal length with the diopter value (8/1000 => 125)
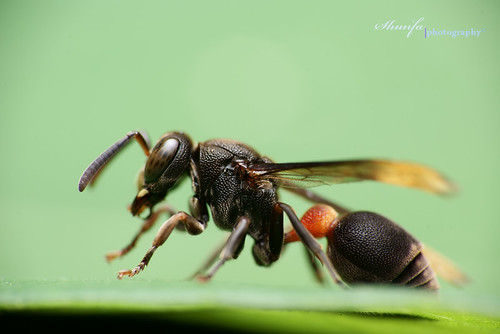
Sample image:

zshunfa @ Flickr, A300 + SAL55200 + Raynox-DCR250 + HVL-F56AM @150mm, Snoot Diffuser.
Feb-09 wasp

Cons: more expensive than the other options mentioned below.
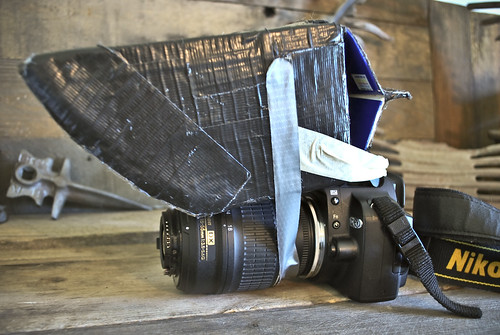
2. Reversed lens

All you need is one of those cheap reversing ring/adapter. About 10USD. Here are some suitable lenses.

a) 50mm. You get a fixed 1:1 when you reverse a 50mm directly onto your camera body.

b) 18-55 kit lens. You get from 1:1 up to 3:1 (at 18mm end) with this setup.

Sam Martin's reversed 18-55 setup.
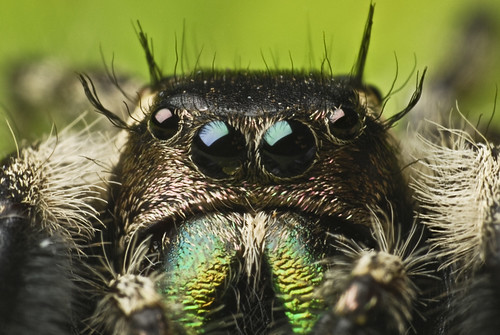
Macro Rig

Sample image:
*re-uploaded* Focus stack of Phidippus otiosus - adult male

c) other lens you can reverse:
- 28mm, gives you about 2:1 magnification
- 20mm, gives you about 3:1 magnification

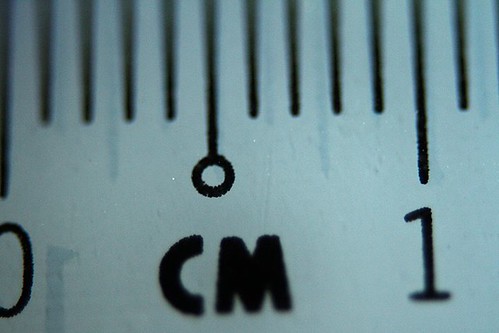
Exact magnification varies with different make/model of lens even though the focal length is the same. The best way to measure magnification is to shoot an MM ruler as explained in this post.

A couple of examples to help you understand what type of reversing ring/adapter you need.

Example #1: Canon 50mm F1.8

Canon EF 50mm f/1.8 II Camera Lens

The filter size is 52mm, therefore you need a 52mm reversing ring for Canon. This is the one you will need:


Example #2: Canon EF-S 18-55mm f/3.5-5.6 IS SLR Lens
Canon EF-S 18-55mm f/3.5-5.6 IS SLR Lens

The filter size is 58mm, therefore you need to get a 58mm reversing ring/adapter for Canon.


Example #3 Nikon 18-55mm f/3.5-5.6G AF-S DX VR Nikkor Zoom Lens

Nikon 18-55mm f/3.5-5.6G AF-S DX VR Nikkor Zoom Lens

The filter size is 52mm (different from the Canon 18-55, with 58mm filter thread size), therefore you need to get a 52mm reversing ring/adapter for Nikon.


Cons: no auto focus, no ETTL/TTL. More about this below.

NOTE: there is now a reversed lens adatper from Meike that allows you to reverse a lens and retain the control of aperture as well as AF.


3) Extension Tubes 


I talked about it in detail here.

Since this post is about macro on the cheap, we will only talk about the type of extension tubes without electrical circuitry nor mechanical coupling, which means no auto focus (AF) and no TTL.

You have to preset your aperture to the desired value, normally F11, which means the lens will close down and the viewfinder will be dim. You might need a focusing light like this.

Since there is no TTL, you will have to guess the flash power required to properly expose a scene at different magnification and F number. This can be quite a pain.

You can use ET (extension tubes) on the 50mm, 28mm, 20mm etc. As mentioned in this post, :

Magnification gained = length of tubes / focal length

For example, with the nifty fifty 50mm F1.8 and full set of 68 mm of tubes

Magnification gained = 68/50 = 1.36X.

Full set of ET on the 28mm will give you around: 68/28 = 2.4x

Full set of ET on the 20mm will give you around: 68/20 = 3.4X

Cons: no auto focus, no ETTL/TTL.


4) Extension tubes + reversed lens

Yes, by now I am sure you have thought about combining method #2 and #3. All you need is the extension tubes and the right reversing ring/adapter.

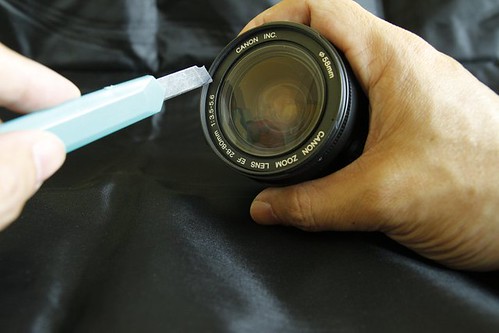
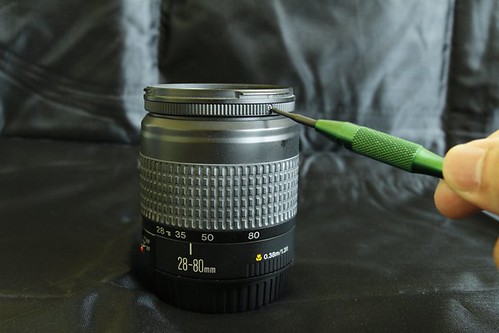
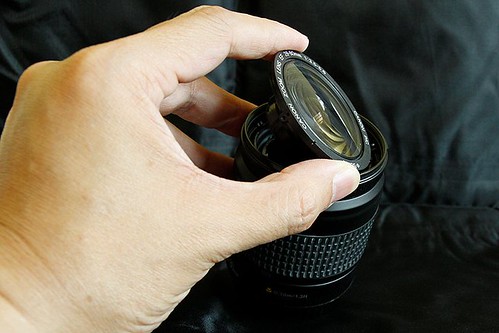
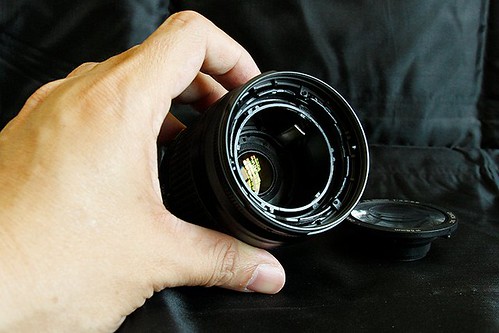
5) A hacked 35-80mm or 28-80mm.

You can remove the front element of a 35-80mm or 28-80mm easily and turn it into a super lightweight macro lens than can go from around 0.7X to 1.8X. More detail here.

Saturday, February 12, 2011

Cheap macro with a 35-80mm lens

In this post, you will see how you can turn either a 35-80mm, or a 28-80mm into a macro lens with absolutely minimal effort. All you need to do is to remove the front element and you will be rewarded with a macro lens capable of going from around 0.7X to 1.8X (1:1.35 to 1.85:1).

For more "cheap macro" ideas, check this out.


This is not my idea. I stumbled across a thread on hacking a 35-80mm in the FredMiranda forum a few days ago. The original idea was with a 35-80. I told CheeWai about this and coincidentally, a friend of his has the 28-80mm so he loaned it for a little experiment. You can see how it went below.

All images and text below are by CheeWai.

Here is how it's done:


DIY Macro 1
10 year old EF 28-80mm kit lens. An old 35-80mm lens will work too. For now, I will use 28-80 as this is what I can find. Lens is courtesy of Tan Bing Liang.


cheap macro 2
For 35-80mm lens, pry open the front sticker to reveal 3 tiny screws


DIY Macro 35-80mm 3
But lucky me, the screws for the 28-80 is located at the side of the focusing ring. Front sticker saved.


35-80mm 4
Simply pop open the front element, be extra careful not to scratch the glass element. This entire process is non destructive and is completely reversible.


28-80mm 5
This is what it looks like with the front element removed. Incidently, the element removed is the focusing element. Therefore, AF and MF will no longer work. Not an issue to me since I slide my camera back and forth when focusing in macro.

Basically, it's done. I now have a zoomable macro lens with a magnification range of 0.7x to 1.8x !!


35-80mm 6
Around 0.74X magnification @ 28mm. Working distance at 1.5 inch


28-80mm 7
Around 1.85x magnification @ 80mm. Working Distance at 1.0 inch


Pros and Cons

Pros:

- Cheap (or free) if you can get hold of the lens.
- Extremely light weight compared to current macro lens
- can still ETTL and control the aperture!
- 0.7x - 1.8x gives flexibility
- super light, weighs almost next to nothing!

Cons:

- Working distance too close.
- optics quality is average.

Notes: with the Canon 35-80mm, you get from around 0.82X magnification to 1.71X life size magnification according to this site.

For more cheap macro ideas, check this out.

   
As an Amazon Associate I earn from qualifying purchases.

LinkWithin

Related Posts with Thumbnails