Full Flash photography is great but you have to diffuse the light really well in order to get that nice soft light. You will notice that your full flash shots are generally sharper than your natural light (no flash) and/or fill flash shots. This is because in full flash photography, you are using the short flash duration to freeze motion, whether that (the motion) of yours or the subjects, or both.
For my full flash 1:1 macro photography, i normally use this setting: 1/200, F11, ISO100, diffused MT-24EX
Now that we are done with the macro photography tips on camera setting, here comes the even more important macro photography tips on light:
1. Flash power vs Flash Duration
You don't really have to know how a flash/speedlite work, but you should know that the flash intensity is constant. So if you need more light, the flash simply stays on for a longer duration. In full flash, since all the light is from the flash, your flash duration will be your virtual/actual shutter speed!
Here's a bit on info on SB800's flash durations i obtained from: http://www.scantips.com/speed.html .
You don't have to remember the numbers, but you do notice that as you use higher flash output/power, the flash duration is longer! And as you reduce the flash output/power, the flash duration becomes shorter.
1/1050 sec. at M1/1 (full) output
1/1100 sec. at M1/2 output
1/2700 sec. at M1/4 output
1/5900 sec. at M1/8 output
1/10900 sec. at M1/16 output
1/17800 sec. at M1/32 output
1/32300 sec. at M1/64 output
1/41600 sec. at M1/128 output
Here is similar flash duration data I found for a 580EX II (from http://www.rodandcone.com/2008/05/flash-durations-for-canon-580ex-ii-and.html). Again, you can see the same trend: higher flash power/output, longer flash duration.
580EXII -- Distance from Flash to Sensor: 2 feet
1/128 power = 1/52718 seconds Flash Duration ---- SCALED to REPORTED DATA
1/64 power = 1/38845 seconds
1/32 power = 1/26887 seconds
1/16 power = 1/18626 seconds
1/8 power = 1/13039 seconds
1/4 power = 1/8447 seconds
1/2 power = 1/5006 seconds
Full power = 1/871 seconds
So it is clear here that we should use as low a flash power as possible to achieve really high shutter speed, as higher shutter speeds normally translate into sharper images.
Just an example to make sure that you really get the point: again, let us assume the same typical full flash setting of 1/200, F11, ISO100, but say we set the flash to manual 1/4th power on a 580 EXII. At this power setting, we can see from the table above that the flash duration is 1/8447 sec. Although the shutter is open for 1/200 second, there's no light coming in. The only light is provided by our flash, which stays on for only 1/8447 seconds. So what is our actual shutter speed there? 1/200 or 1/8447? Well, i am sure you get the answer right - 1/8447 seconds!
2. Inverse Square Law for Light
In English, basically it means that if you reduce the flash-subject distance by half, the intensity will increase fourfolds (4 times!). In other words, by bringing your flash closer to the subject, your flash doesn't have to work as hard i.e shorter flash duration ie higher virtual shutter speed.

Borb [GFDL or CC BY-SA 3.0], via Wikimedia Commons
Example: if you need full power (1/1) at 8" working distance, at 4", you'll only need 1/4th power. Less power is good as it means shorter flash duration thus higher virtual shutter speed.
Looking at the flash duration table for a 580EXII above, that would mean shooting at 1/8447 (1/4th power) instead of 1/871 (full power). So which shutter speed do you prefer? 1/8447 or 1/871? 1/8447 for sure! It's a no-brainer isn't it?
This is also why a lens with short focal length is better for full flash photography. 50mm, 60mm, 90mm, 100mm, 105mm. The longer ones, 150, 180, 200 are more meant for natural light/fill flash photography. But of course, you can always use a flash bracket to bring the flash really close to subject and still get good light out of it.
Read more about it here: http://en.wikipedia.org/wiki/Inverse-square_law
3. Apparent light size
No one explains it better than Mr. Strobist himself so go read it there.
A few images to make it easier for you to understand and grasp the concept of "Apparent Light Size". Please also read MT-24EX on Sigma 150 and MP-E65 if you need to know more about apparent light size.
Pay attention to the the twin specular highlight/catch lights on the scroll wheel, and also the SIZE of the specular highlight. You will notice the trend: as the working distance reduces, the catch lights get bigger in size and the specular highlight becomes less harsh.
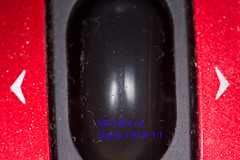
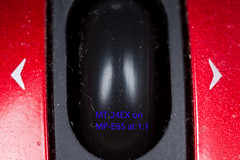
Left: A diffused MT-24EX
Right: The same diffused Canon MT-24EX Macro Twin Flash
The same light/flash setup gives me different result at different working distance of 7.9" vs 4". Needless to say, the light is better at 4". Note the less annoying highlight and the relatively bigger "catch lights" on the scroll wheel on the image on the right. That's what we mean by "Apparent Light Size".
Got it yet? Another example:
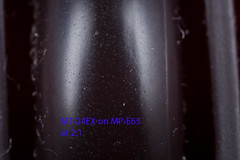
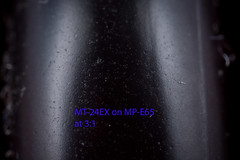
Left: a diffused MT-24EX
Right: same diffused MT-24EX
The light was great at 2.5" working distance, but even better at 2" working distance! Also note the even bigger catch light on the scroll wheel. Again, "apparent light size"!
These three important facts are the reason why in full flash photography, you want your light source to be as big and as close to the subject as possible.
That's when a flash bracket comes in handy, especially when it comes to higher magnification where every slight movement is more amplified.
That's the reason why i use a diffuser like this for my bracketed 580EXII and it's basically resting right on the front of the lens/filter. For more info, check out my other post: My Macro Rig.
You can also get a ready made, foldable ones like this:

Lumiquest Softbox. Click image to view more details.
Note: i am using the MT-24EX twin flash
Canon MT-24EX Macro Twin Lite Flash for Canon Digital SLR Cameras
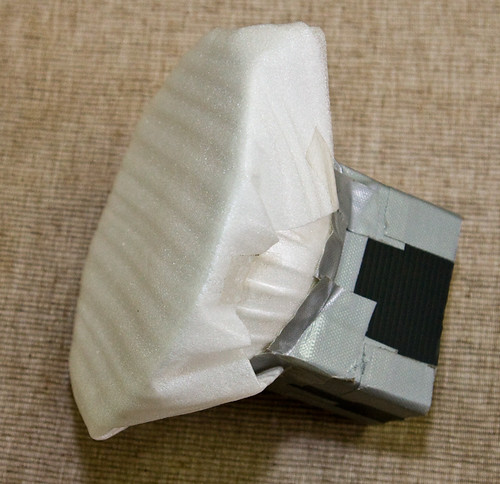
At 1 to 2X, you can still get away with a speedlight (on hotshoe) and a snoot-diffuser. Something like this:

Check out how i DIYed the snoot diffuser in the image above here.
A light weight but still powerful 270EX will suffice as long as you can bring it close to the front of the lens, near the subject. Check out this post to see a few great sample macro rigs.
That's it for the full flash macro photography tips. A bit lengthy but you really have to know all these in order to design/DIY a diffuser that will give you good light in your full flash macro photography.
Finally, whenever the natural light is good, which occurs normally either early in the morning, late in the afternoon, or at least under shade or during gloomy/overcast day, don't forget to just turn off your flash and experiment with natural light. Check out more info here.
As an Amazon Associate, I earn from qualifying purchases.
I think so :P
ReplyDeletemanyak bagus!
ReplyDeleteqqmeng
Derrick...is this edited version easier to digest? I need to know which part is not clear so I can rewrite it and/or add in more examples and images :)
ReplyDeleteKurt,
ReplyDeleteThanks for your sharing here and i learn alot from your blog.
You're most welcome George :) and thanks for dropping by :)
ReplyDeleteVery informative. Good job Sifoo Kurt.
ReplyDeleteThanks JJ.
ReplyDeletelearn more from u kurt..really2 usefull =)
ReplyDeleteThis comment has been removed by a blog administrator.
ReplyDeleteThis comment has been removed by a blog administrator.
ReplyDeleteThis comment has been removed by a blog administrator.
ReplyDelete