Just a few non technical macro photography tips to share.
Attire
I personally advise that you wear a long sleeve T shirt and a pair of jeans. This should protect from direct sunlight and to mosquitoes too, to certain extent. Tight knit socks too if possible to keep the leeches out. Be sure to tuck your pants into the socks. You can also get a pair of Leech Proof Socks from our local MNS (Malaysian Nature Society, Kuala Lumpur, Malaysia) A hat would be a good idea as well. You might also want to bring a small towel.
Mosquito Repellent
I use OFF, which contains DEET - N,N-Diethyl-meta-toluamide, (abbreviated DEET). It is the most common active ingredient in insect repellents. After applying any chemical based repellent, make sure you clean/wipe your hands before handling your camera. As mentioned on Wikipedia: DEET is an effective solvent,[4] and may dissolve some plastics, rayon, spandex, other synthetic fabrics, leather, and painted or varnished surfaces including nailpolish.
Better be safe than sorry:)
BTW, if you find a leech (or two) on any part of your body, helping itself on all-you-can-drink buffet, try not to yank it off as it will create bigger wound. Just put a bit of OFF on the leech and it will let go immediately.
If you prefer a non chemical based repellent, you can look at Mosi Guard which contains only natural ingredient. The active ingredient of Mosi-guard is Citriodol, a naturally occurring extract of lemon eucalyptus oil.
Raincoat
Yes, after all the money you have invested in your macro gears, you do not want them to get wet, do you? :D. Always carry a light weight raincoat with you. I have one in my shoulder bag at all times!
Drinking Water
Yes, it gets really hot out there and of course you will sweat a lot. Carry at least 500ml of drinking water with you and take a sip from time to time. It's important to rehydrate yourself periodically.
You can check out other stuff i bring for my macro outing here.
Please also check out non technical Tips on getting sharper images
Saturday, August 22, 2009
Friday, August 21, 2009
Diffraction Softness and Focus Stacking
There are a few softwares for focus stacking. CombineZ is a great focus stacking freeware that you can use to merge the in-focus areas of different images with same FOV (but different DOF zone) in order to achieve bigger DOF (Depth of Field). I have only used it in macro photography/macro images but I am sure it can be used in landscapes as well.
You can also use CS4/5/6 for focus stacking. File - Scripts - Load files into stack. Once the images are aligned, highlight all the layers, then Edit - Auto Blend Layers. Be sure to check your images for any stacking artefacts.
Other stacking softwares you might want to consider are Zerene Stacker and Helicon Focus.
DOF is like real estate in macro photography, especially so when you go into higher magnification!
In macro,
DOF = 2 N c x [ (m+1)/m^2]
N - f number, c - circle of confusion, = 0.018mm for aps-c, m - magnification
Let's say we shoot at F11 at 1X, the DOF = 2 * 11 * 0.018 [ 2/1] = 0.792 mm
At 2X and F11, DOF = 0.297 mm
At 3X and F11, DOF = 0.176 mm
At 4X and F11, DOF = 0.123 mm
At 5X and F11, DOF = 0.095 mm
However, according to the DOF table in the MPE65 booklet:
At 1X and F11, DOF = 1.584 mm
At 2X and F11, DOF = 0.594 mm
At 3X and F11, DOF = 0.352 mm
At 4X and F11, DOF = 0.247 mm
At 5X and F11, DOF = 0.190 mm
You might notice that the DOF numbers in the booklet are two times the values i calculated using the DOF equation. Probably has something to do with pupil magnification? http://en.wikipedia.org/wiki/Depth_of_field
Can we use big F number to get big DOF?
To make matter worse, you know you can't shoot at F11 beyond 3X. The diffraction softness will be so pronounced that it severely compromises the image sharpness!

I photographed the scroll wheel of my mouse with the MPE65 at 2X. First at F9 (left), then F16 (right). After that, I did a 100% crop as shown by the yellow boxes above. You can see the 100% crop images below.

Compare the image on the left (F9, 2:1) to the one on the right (F16, 2:1). The image on the right is obviously very very soft (not out of focus) due to diffraction.

 Note: at 1X, i sometimes shoot at F16, which gives me a DOF of 2.240 (as opposed to 1.584 at F11 -
that's a huge difference!!!) with reasonable sharpness. However, it all depends on your personal preference and tolerance on DOF vs Diffraction Softness. You can't have both. You need to choose a balance that you can live with.
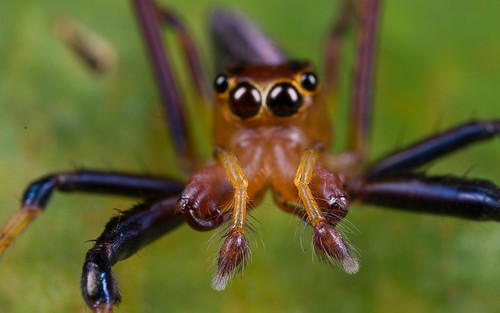
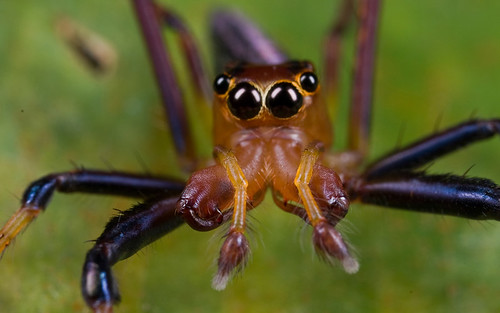
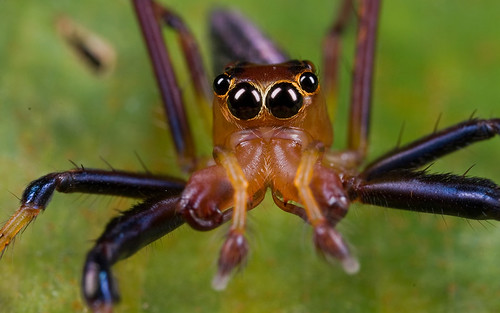
When the subject is willing and you're up for a challenge, you can try taking multiple shots for focus stacking. Focus on different DOF planes of the subject, provided the subject is stationary and you don't change the FOV much.
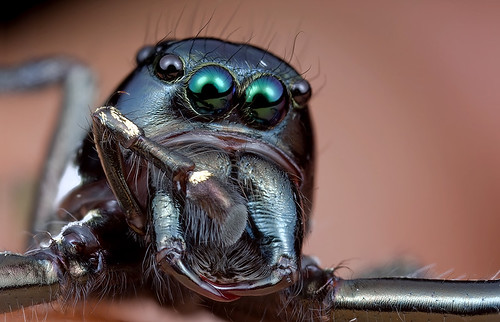
I was lucky with this handsome jumping spider as it allowed me to take four shots of him up close.
Notice all four images have different DOF planes..ie focused at different planes of the jumping spider
All images taken with a Canon 40D, Canon MPE65 1X-5X Macro Lens and Canon MT24EX Twin Flash
 .
.

You can try to stack these manually in Adobe Photoshop by using layer mask and selectively reveal the in-focus areas but it's quite a chore when there are too many donor images. Luckily, this can be automated using Focus Stacking software such as CombineZ
Just go File - New, then select all the images for focus stacking. Then Macro - Do Stack and wait.
Once it's done, just go File - Save Frame/Picture As. Pay attention to the edges as CombineZ almost always adds canvas the the frame, which needs to be cropped off. Also check for other stacking artifacts like halos, duplicated hairs etc.
Here's the outcome.

Auto Focus stacking can be done in CS4 as well but i've never tried that so i can't comment much on that.
You should also try manual focus stacking in Adobe Photoshop. It's really easy once you get the hang of it. There is a tutorial here.
Other examples of stacked images:
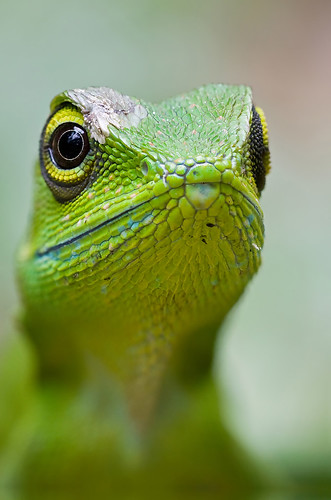
Green crested lizard, Bronchocela cristatella. Stacked from 9 natural light, handheld shots.
Jumping spider, stacked from 2 images in CombineZP:
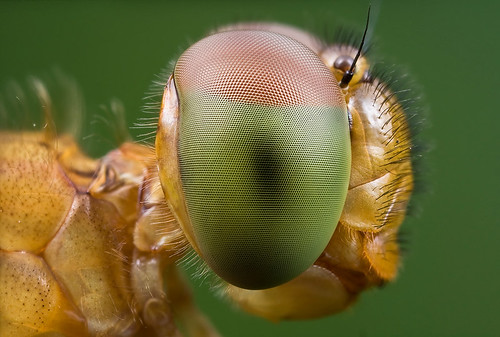
Dragonfly, stacked from 2 images:
You can also use CS4/5/6 for focus stacking. File - Scripts - Load files into stack. Once the images are aligned, highlight all the layers, then Edit - Auto Blend Layers. Be sure to check your images for any stacking artefacts.
Other stacking softwares you might want to consider are Zerene Stacker and Helicon Focus.
DOF is like real estate in macro photography, especially so when you go into higher magnification!
In macro,
DOF = 2 N c x [ (m+1)/m^2]
N - f number, c - circle of confusion, = 0.018mm for aps-c, m - magnification
Let's say we shoot at F11 at 1X, the DOF = 2 * 11 * 0.018 [ 2/1] = 0.792 mm
At 2X and F11, DOF = 0.297 mm
At 3X and F11, DOF = 0.176 mm
At 4X and F11, DOF = 0.123 mm
At 5X and F11, DOF = 0.095 mm
However, according to the DOF table in the MPE65 booklet:
At 1X and F11, DOF = 1.584 mm
At 2X and F11, DOF = 0.594 mm
At 3X and F11, DOF = 0.352 mm
At 4X and F11, DOF = 0.247 mm
At 5X and F11, DOF = 0.190 mm
You might notice that the DOF numbers in the booklet are two times the values i calculated using the DOF equation. Probably has something to do with pupil magnification? http://en.wikipedia.org/wiki/Depth_of_field
Can we use big F number to get big DOF?
To make matter worse, you know you can't shoot at F11 beyond 3X. The diffraction softness will be so pronounced that it severely compromises the image sharpness!
I photographed the scroll wheel of my mouse with the MPE65 at 2X. First at F9 (left), then F16 (right). After that, I did a 100% crop as shown by the yellow boxes above. You can see the 100% crop images below.
Compare the image on the left (F9, 2:1) to the one on the right (F16, 2:1). The image on the right is obviously very very soft (not out of focus) due to diffraction.
that's a huge difference!!!) with reasonable sharpness. However, it all depends on your personal preference and tolerance on DOF vs Diffraction Softness. You can't have both. You need to choose a balance that you can live with.
When the subject is willing and you're up for a challenge, you can try taking multiple shots for focus stacking. Focus on different DOF planes of the subject, provided the subject is stationary and you don't change the FOV much.
I was lucky with this handsome jumping spider as it allowed me to take four shots of him up close.
Notice all four images have different DOF planes..ie focused at different planes of the jumping spider
All images taken with a Canon 40D, Canon MPE65 1X-5X Macro Lens
You can try to stack these manually in Adobe Photoshop
Just go File - New, then select all the images for focus stacking. Then Macro - Do Stack and wait.
Once it's done, just go File - Save Frame/Picture As. Pay attention to the edges as CombineZ almost always adds canvas the the frame, which needs to be cropped off. Also check for other stacking artifacts like halos, duplicated hairs etc.
Here's the outcome.
Auto Focus stacking can be done in CS4
You should also try manual focus stacking in Adobe Photoshop
Other examples of stacked images:
Green crested lizard, Bronchocela cristatella. Stacked from 9 natural light, handheld shots.
Jumping spider, stacked from 2 images in CombineZP:
Dragonfly, stacked from 2 images:
Monday, August 17, 2009
What macro lens to buy?
Alternatives
Before you say goodbye to your money and hi to your new macro lens, it's your own responsibility to make sure that you really like macro. I am telling you this only because I've seen too many people who bought a macro lens but sold it a couple of months later.
It's a good idea to try out macro before you really purchase a true macro lens. Here are a few reasonably affordable ways to try out macro:
1. close-up filter
Raynox DCR250 comes to mind. It has a +8 diopter and when coupled to a 50mm, will give you approximately 0.4X. If you have a tele lens like 50-200, it's even better. Just snap a DCR250 onto it and you'll get approximately 1.6X magnification at the 200mm end. DCR250 costs about RM250 and works on any lens with filter size from 52mm to 67mm.


2. Extension tubes
ET will cost you slightly more than the DCR250 but if gives you higher magnification esp on shorter lens like the 50mm. For example, a full set of 68mm ETs on a 50mm will give you approx 1.4X magnification. It won't work so well on longer lenses though. There are generally two types of ETs....those with electronic contacts and those without. The non electronic contact type is much cheaper, of course.
Your working distance will be reduced when using the ET. More about Extension Tubes here.


3. Tele converter
Normally comes in 1.4X and 2X. 2X is not recommended as the IQ will deteriorate too much. Only Nikon has a 1.7X TC with great IQ as well. Soligor has a 1.7X TC (for Nikon, Canon etc) as well but I haven't seen any reviews on the internet yet. If you come across any review, do let me know.
TC will give you longer working distance.


4. Reversing the lens
You'll need a reversing ring to do this. You can reverse either prime lens or kit lens:
1. reversed 50mm - gives you 1:1, you can't increase nor decrease the magnification. It's all fixed.
2. reversed kit lens, 18-55mm, you'll get from around 1X to 3X.
3. reversed wide, prime lens, like the 20mm, or 28. You'll get like 4X to 8x depending on which prime lens you use and the length of tubes you used.
No ETTL, AF when you are using reversing ring, unless you are using the fancy type like the Novoflex EOS Retro or DMF Supermacro. More about these here.


Once you are really sure that you still want a macro lens, then consider these options:
True Macro Lens
1. 50 mm to 70mm range
These are lighter and give you shorter working distance. May not be good for approaching skittish bugs but the shorter working distance gives you good apparent light size, and thus better light in general if you are doing full flash photography.
Example: Canon EF-S 60mm f/2.8 Macro USM Digital SLR Lens for EOS Digital SLR Cameras
Tamron AF 60mm f/2.0 SP DI II LD IF 1:1 Macro Lens for Canon Digital SLR Cameras
2. 90 to 105mm range
Slightly longer working distance and only slightly heavier.
The lenses with shorter focal lengths in (1) and (2) above are lighter and easier to handle and highly recommended for beginners.
Canon EF 100mm f/2.8L IS USM 1-to-1 Macro Lens for Canon Digital SLR Cameras
Tamron AF 90mm f/2.8 Di SP A/M 1:1 Macro Lens for Canon Digital SLR Cameras
3. 150 to 200mm range.
These might be a bit heavy for a beginner. The longer focal length gives you great bokeh becuase it's able to isolate the background better. However, the longer working distance also means smaller apparent light size and as a result, the quality of light may not be so great for full flash photography. But it's great for natural light and fill flash photography and the longer working distance also means you'll have higher chances of capturing those skittish bugs.
Sigma 150mm f/2.8 EX DG HSM APO HSM IF Macro Lens for Nikon SLR Cameras
Canon EF 180mm f3.5L Macro USM AutoFocus Telephoto Lens for Canon SLR Cameras
Bear in mind that these lenses allow you to achieve a maximum magnification of 1:1 (life size). For example, if you shoot a 22mm object with a 40D at 1:1, it should fill up the width of the frame. You can also focus to infinity with these macro lenses.
An odd one out here would be the one and only Canon MP-E65 1X to 5X macro lens. It's macro lens and ONLY for macro only? What does it mean? It means you the MINIMUM magnification is 1X - you can't go any smaller than that. The maximum working distance is 4 inches and it won't focus beyond that!
Canon MP-E 65mm f/2.8 1-5X Macro Lens for Canon SLR Cameras
What's the implication of this? Well, if you use an MP-E65 mm with a 40D body with 1.6X crop sensor (22mm sensor width), at 1:1 (the minimum magnification), you won't be able to shoot anything bigger than 22mm. If real life, it's more like 15mm as you need a bit of space for framing and composition. Plus, the bug you shoot might have long antennae and things like that! If you use the MP-E65 with a FF (Full Frame) body such as the 5D/5D Mark II, you'll be able to shoot bigger bugs/subjects. The 35mm sensor width means you'll be able to fit a 35mm bugs into the frame in theory. In real life, probably 30mm?
Don't believe anything you read on certain lenses give you better DOF (Depth of Field) because it's BS. DOF in macro range doesn't depend on focal length.
In macro,
DOF = 2 N c x [ (m+1)/m^2]
N - f number, c - circle of confusion, = 0.018mm for aps-c, m - magnification
Before you say goodbye to your money and hi to your new macro lens, it's your own responsibility to make sure that you really like macro. I am telling you this only because I've seen too many people who bought a macro lens but sold it a couple of months later.
It's a good idea to try out macro before you really purchase a true macro lens. Here are a few reasonably affordable ways to try out macro:
1. close-up filter
Raynox DCR250 comes to mind. It has a +8 diopter and when coupled to a 50mm, will give you approximately 0.4X. If you have a tele lens like 50-200, it's even better. Just snap a DCR250 onto it and you'll get approximately 1.6X magnification at the 200mm end. DCR250 costs about RM250 and works on any lens with filter size from 52mm to 67mm.
2. Extension tubes
ET will cost you slightly more than the DCR250 but if gives you higher magnification esp on shorter lens like the 50mm. For example, a full set of 68mm ETs on a 50mm will give you approx 1.4X magnification. It won't work so well on longer lenses though. There are generally two types of ETs....those with electronic contacts and those without. The non electronic contact type is much cheaper, of course.
Your working distance will be reduced when using the ET. More about Extension Tubes here.
3. Tele converter
Normally comes in 1.4X and 2X. 2X is not recommended as the IQ will deteriorate too much. Only Nikon has a 1.7X TC with great IQ as well. Soligor has a 1.7X TC (for Nikon, Canon etc) as well but I haven't seen any reviews on the internet yet. If you come across any review, do let me know.
TC will give you longer working distance.
4. Reversing the lens
You'll need a reversing ring to do this. You can reverse either prime lens or kit lens:
1. reversed 50mm - gives you 1:1, you can't increase nor decrease the magnification. It's all fixed.
2. reversed kit lens, 18-55mm, you'll get from around 1X to 3X.
3. reversed wide, prime lens, like the 20mm, or 28. You'll get like 4X to 8x depending on which prime lens you use and the length of tubes you used.
No ETTL, AF when you are using reversing ring, unless you are using the fancy type like the Novoflex EOS Retro or DMF Supermacro. More about these here.
Once you are really sure that you still want a macro lens, then consider these options:
True Macro Lens
1. 50 mm to 70mm range
These are lighter and give you shorter working distance. May not be good for approaching skittish bugs but the shorter working distance gives you good apparent light size, and thus better light in general if you are doing full flash photography.
Example: Canon EF-S 60mm f/2.8 Macro USM Digital SLR Lens for EOS Digital SLR Cameras
Tamron AF 60mm f/2.0 SP DI II LD IF 1:1 Macro Lens for Canon Digital SLR Cameras
2. 90 to 105mm range
Slightly longer working distance and only slightly heavier.
The lenses with shorter focal lengths in (1) and (2) above are lighter and easier to handle and highly recommended for beginners.
Canon EF 100mm f/2.8L IS USM 1-to-1 Macro Lens for Canon Digital SLR Cameras
Tamron AF 90mm f/2.8 Di SP A/M 1:1 Macro Lens for Canon Digital SLR Cameras
3. 150 to 200mm range.
These might be a bit heavy for a beginner. The longer focal length gives you great bokeh becuase it's able to isolate the background better. However, the longer working distance also means smaller apparent light size and as a result, the quality of light may not be so great for full flash photography. But it's great for natural light and fill flash photography and the longer working distance also means you'll have higher chances of capturing those skittish bugs.
Sigma 150mm f/2.8 EX DG HSM APO HSM IF Macro Lens for Nikon SLR Cameras
Canon EF 180mm f3.5L Macro USM AutoFocus Telephoto Lens for Canon SLR Cameras
Bear in mind that these lenses allow you to achieve a maximum magnification of 1:1 (life size). For example, if you shoot a 22mm object with a 40D at 1:1, it should fill up the width of the frame. You can also focus to infinity with these macro lenses.
An odd one out here would be the one and only Canon MP-E65 1X to 5X macro lens. It's macro lens and ONLY for macro only? What does it mean? It means you the MINIMUM magnification is 1X - you can't go any smaller than that. The maximum working distance is 4 inches and it won't focus beyond that!
Canon MP-E 65mm f/2.8 1-5X Macro Lens for Canon SLR Cameras
What's the implication of this? Well, if you use an MP-E65 mm with a 40D body with 1.6X crop sensor (22mm sensor width), at 1:1 (the minimum magnification), you won't be able to shoot anything bigger than 22mm. If real life, it's more like 15mm as you need a bit of space for framing and composition. Plus, the bug you shoot might have long antennae and things like that! If you use the MP-E65 with a FF (Full Frame) body such as the 5D/5D Mark II, you'll be able to shoot bigger bugs/subjects. The 35mm sensor width means you'll be able to fit a 35mm bugs into the frame in theory. In real life, probably 30mm?
Don't believe anything you read on certain lenses give you better DOF (Depth of Field) because it's BS. DOF in macro range doesn't depend on focal length.
In macro,
DOF = 2 N c x [ (m+1)/m^2]
N - f number, c - circle of confusion, = 0.018mm for aps-c, m - magnification
Friday, August 7, 2009
How to create animation from still images?
But why would I want to take the trouble to create animation from the still images? Because it's fun! And it's really easy too!
Watch this animation. Might take a while to load so be patient :)
All macro images shot with a 40D, Canon MP-E65 1X-5X Macro Lens and Canon MT-24EX Twin Flash
A lovely grasshopper answering nature's call:D
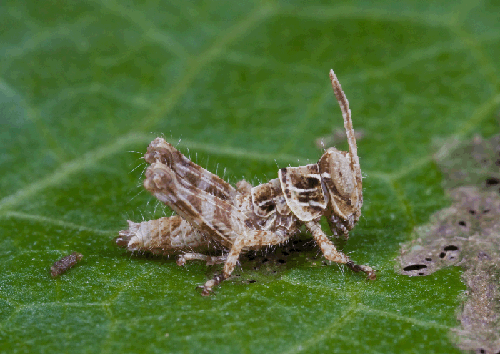
You might have guessed correctly that the animation above was created from 3 still images. Now let me walk you through the whole process.
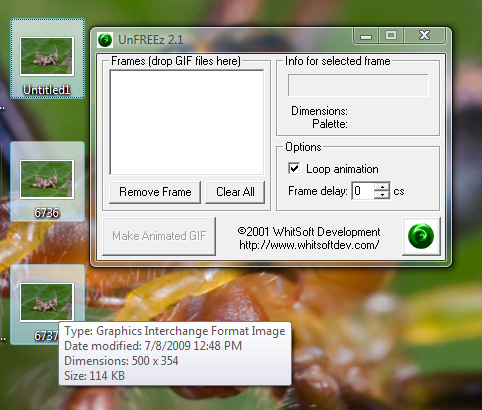
I am sure there are many ways to create an animation like this. As for me, i use this freeware called Unfreez.
And here are the three images I used for the animation:


The images have to be in gif format (not jpg) but you can do the conversion easily in either Photoshop or most other programs. Just open the jpg in photoshop then File - Save As, and selected CompuServe GIF from the drop down menu. You can also use the Save For Webs & Devices then choose GIF from the drop down menu on the top right.
Next, you launch the UnFreez program, then highlight all the gif images and drag them into the already opened UnFreez box:
Then select the amount of frame delay you want. For this one, I set it at 60 cs. But it's all up to you and the kind of animation you work on. I also check "Loop Animation" so the animation would loop itself.
Last but no least, it might be worthwhile to align the images first if they are not well aligned in the first place. This can be done easily in Photoshop: Files - Scripts - Load Files Into Stack. Make sure you check "Attempt to Automatically Align Source Images".
The animation will work only if you open it in a browser, such as IE, Opera, Firefox etc. It won't work if you open it in Photoshop, Windows Photo Viewer, etc. If you upload it to Flickr, only the Original version will have animation. The resized ones won't.
Here are some other animations i've done in the past: Damselfly Emergence. Big files..but definitely worth seeing. Gotta admit that a HD Video would come in handy here.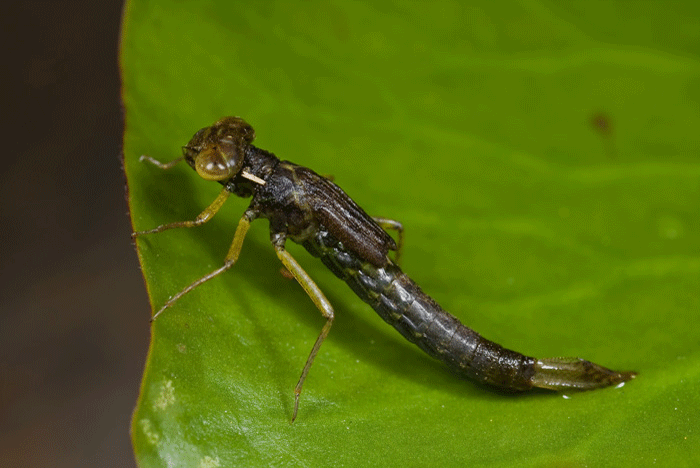
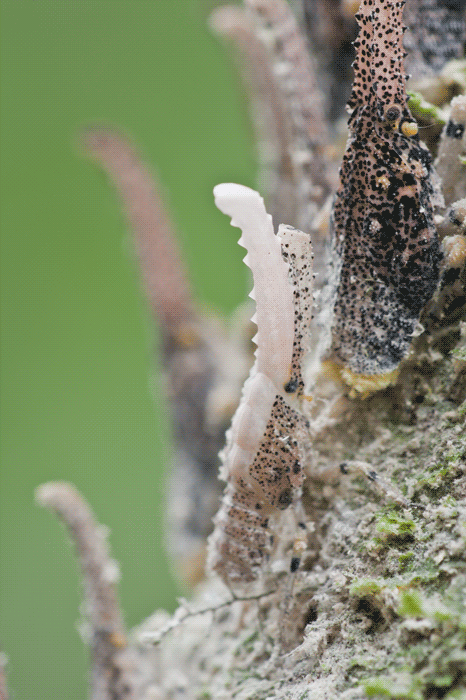
A Zanna sp. lantern bug/lanternfly molting from 2nd instar(?) to 3rd instar(3).
Cicada emergence

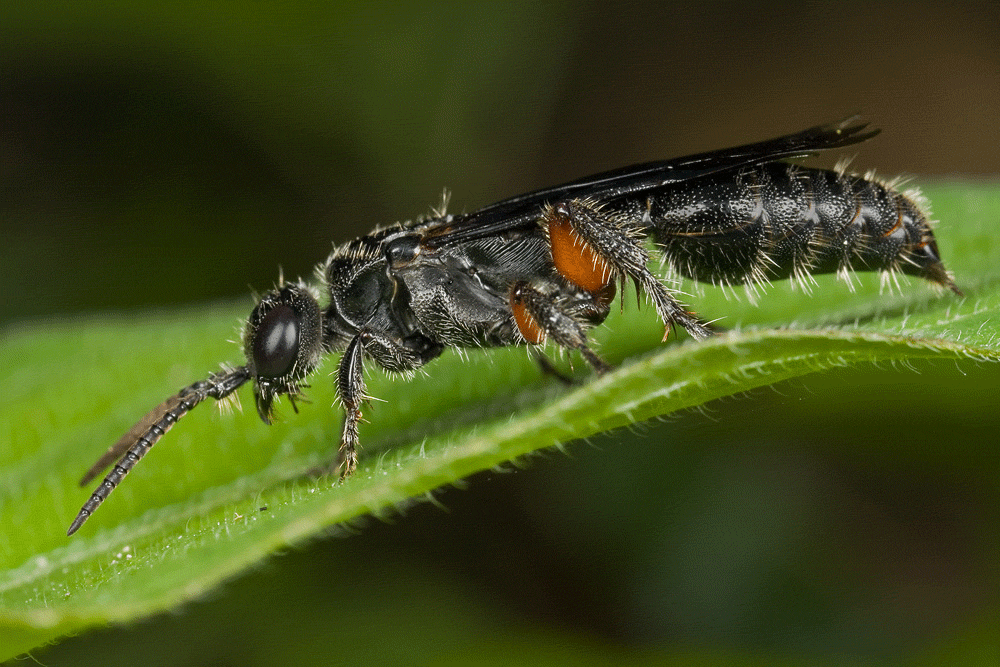
How a wasp get its killer waist
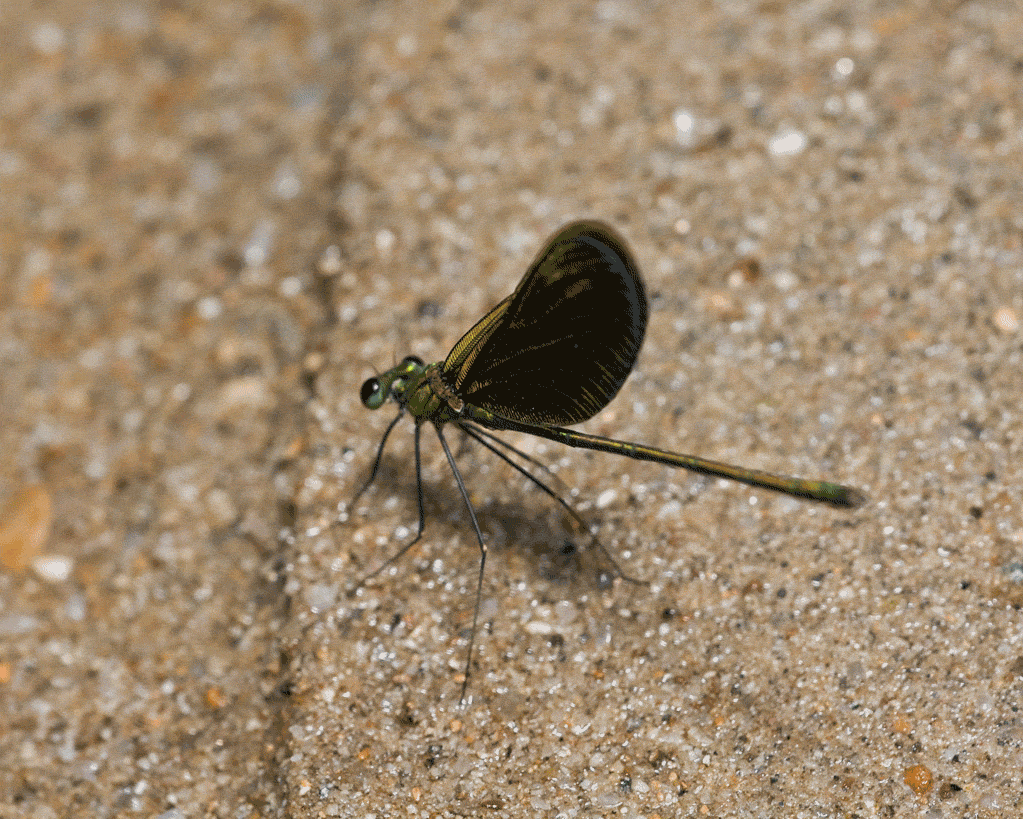
A gorgeous green metalwing damselfly, Neurobasis chinensis, showing off his stunning wings color!

You can also create animation all from within Photoshop CS itself. I'll blog about this soon.
Watch this animation. Might take a while to load so be patient :)
All macro images shot with a 40D, Canon MP-E65 1X-5X Macro Lens
A lovely grasshopper answering nature's call:D
You might have guessed correctly that the animation above was created from 3 still images. Now let me walk you through the whole process.
I am sure there are many ways to create an animation like this. As for me, i use this freeware called Unfreez.
And here are the three images I used for the animation:
The images have to be in gif format (not jpg) but you can do the conversion easily in either Photoshop or most other programs. Just open the jpg in photoshop then File - Save As, and selected CompuServe GIF from the drop down menu. You can also use the Save For Webs & Devices then choose GIF from the drop down menu on the top right.
Next, you launch the UnFreez program, then highlight all the gif images and drag them into the already opened UnFreez box:
Then select the amount of frame delay you want. For this one, I set it at 60 cs. But it's all up to you and the kind of animation you work on. I also check "Loop Animation" so the animation would loop itself.
Last but no least, it might be worthwhile to align the images first if they are not well aligned in the first place. This can be done easily in Photoshop: Files - Scripts - Load Files Into Stack. Make sure you check "Attempt to Automatically Align Source Images".
The animation will work only if you open it in a browser, such as IE, Opera, Firefox etc. It won't work if you open it in Photoshop, Windows Photo Viewer, etc. If you upload it to Flickr, only the Original version will have animation. The resized ones won't.
Here are some other animations i've done in the past: Damselfly Emergence. Big files..but definitely worth seeing. Gotta admit that a HD Video would come in handy here.
A Zanna sp. lantern bug/lanternfly molting from 2nd instar(?) to 3rd instar(3).
Cicada emergence
How a wasp get its killer waist
A gorgeous green metalwing damselfly, Neurobasis chinensis, showing off his stunning wings color!
You can also create animation all from within Photoshop CS
Subscribe to:
Posts (Atom)