If you are looking for a great DIY macro diffuser for the MT24EX, look no further. You can find the cheapest yet the best DIY concave diffuser I've DIYed so far here.
Let me re-iterate that macro doesn't have to cost you an arm and a leg. If you haven't already read it in "My Macro Rig - Then and Now", check it out.
Note: snoot-diffuser is just a temporary measure for those who owns a big speedlight and wants to experiment macro. For those who are really interested in macro, I really recommend that you get yourself a lightweight speedlight such as the Canon Speedlite 270EX II
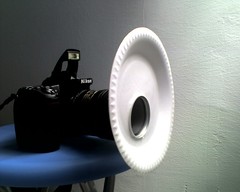
I started shooting macro with just the pop-up/on board flash and a polyfoam plate diffuser.
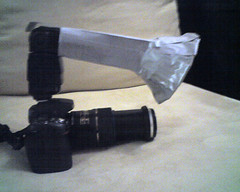
As soon as I could afford a speedlight, I got myself one and immediately worked on a DIY Snoot-Diffuser which looks like this:
Since switching to Canon just because of the irresistible and one of its kind Canon MPE 65mm f/2.8 1-5X Macro Lens
It took me less than 1 hour to complete the whole DIY process. Among the items you will need for this snoot diffuser DIY project:
1. black duct tape - on the outside to make your snoot-diffuser look professional :D
2. double sided tape/glue - for adhering the wrinkled aluminum foil onto the inside
3. scissors and cutter
4. a snoot and bowl, or raw material to make them.
5. you might (or might not) need moldable plastic. It is really useful, not just for this DIY project but for many others as well.

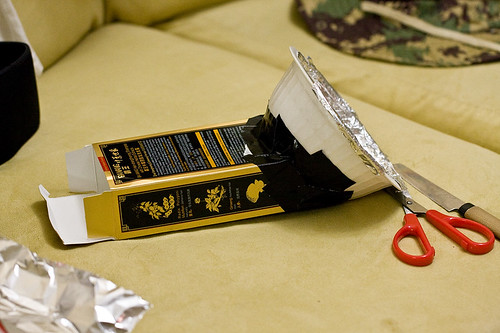
First, you'll need a box that can more or less fit onto the flash head of your speedlight. If you can't find one, you can always DIY a box.
-->
I used a Bawang shampoo box :D. If you can't find a suitable box, no worries. Use a pocket file and wrap it around the flash head to form a box!

Notice the styrofoam bowl is secured to the box at an angle? You'll have to find out what the best angle is by testing it out. You don't want the light to overshoot nor undershoot. Try to make sure at that angle, the light covers your subject when at 1:1 magnification. Oh yeah, reminds me to get a proper knife/cutter.
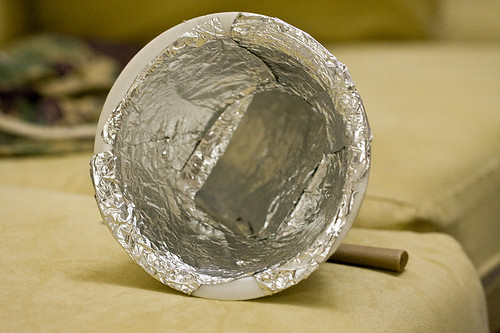
The next task is to line the inside with kitchen aluminum foil. I used double sided tape here. First, the bowl.
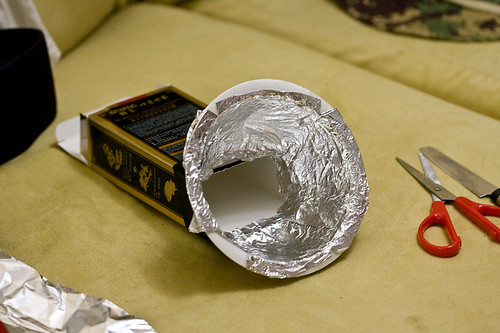
Then the snoot/box as well. Notice the aluminum foils were all wrinkled up? That way it'll bounce the light better.
This is how the semi-completed DIY Snoot-diffuser looks when attached to the 580EX II on a 40D and Canon 100mm F/2.8 IS. Incidentally, this snoot also fits the SB900. The lens was zoomed in to to 1:1 and focused onto the spray bottle. You then press the shutter button, with the camera still on the sofa. That way you can check if the light actually overshoots/undershoots. You want the light to nicely cover your subject at 1:1.
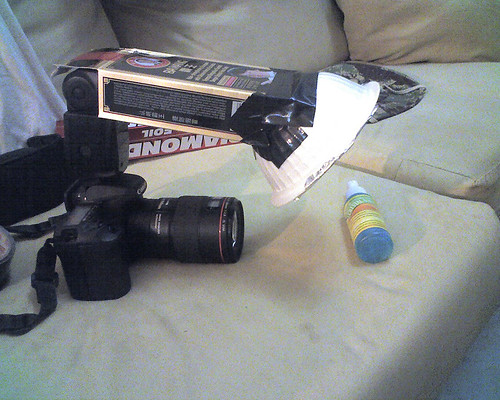
After a bit of field test yesterday, I found out that the light actually overshoots a bit so I'll have to mod my DIY Snoot Diffuser to point the bowl even further downwards.
If you are really good at this DIY thingy, you can even mod your snoot so that the angle of the bowl is adjustable!
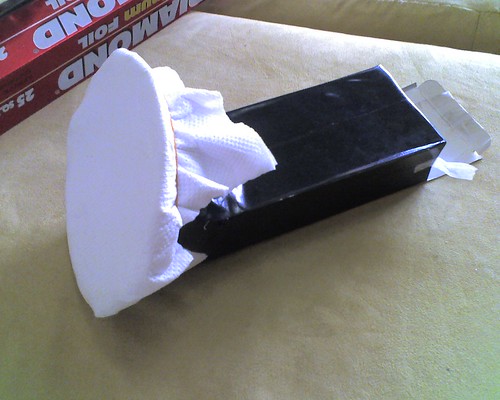
And of course, the final step was to put black duct tape all over the snoot diffuser. Gotta make it look really professional, don't I?:D

I ran out of styrofoam/polyfoam plate so I used three sheets of kitchen towels for front diffusion material. The diffusion from polyfoam plate is really great but there's a bit more light loss there. It all depends on your diffusion vs light loss preference.
Here's a sample shot of a handsome jumping spider I shot yesterday using this snoot diffuser. 1/200, F11, ISO100, 1:1, handheld.

-->
I have since made a slight improvement to this Snoot-Diffuser to make the angle adjustable. Check it out here.
As an Amazon Associate I earn from qualifying purchases.
Wah, new lens!
ReplyDeleteLOL..i wish, Tom Cruise...but not mine..not yet:D
ReplyDeletenot yet.. but soon... LOL!~
ReplyDeleteAnthony..:D:P...yes..soon...the sooner the better:D
ReplyDeleteWhat instead of the MP-E 65mm?
ReplyDeleteLove the black tape to make the diffuser look professional, ingenious. :o)
Ha, Mel, i'm not giving up the MPE for anything :D. But i do need a 2nd macro lens that's capable of going less than 1:1 for those big bugs/insects :)
ReplyDeleteNice article and pictures here. Just a question: how do u fit the bawang box exactly to your flash size?
ReplyDeleteThanks Donno. As it was, the bawang box was a bit loose when fitted onto the 580EXII flash head. Just add a bit of padding on the inside so it will fit in nice and tight and won't come lose in the middle of shooting :)
ReplyDeleteWow thanks.... gotta find a similar box (or use bawang shampoo for the next 1 month) and try it for myself. Thanks :)
ReplyDeleteWell you don't have to wait. You can just use any paper folder and shape your own snoot/box from there :)
ReplyDeletemy gosh !! impressed !! hmm ... i think i need to start doing it..
ReplyDeleteThanks Soo. Yes, good and efficient diffusion is vital for full flash macro photography :)
ReplyDeletewow..
ReplyDeletehey kurt, i started joining george & abel they all for macro shoot. i think you know them as well. i've yet to make the diffuser... :P i posted some photos in fb, maybe i can add u and give me a few comments? :)
ReplyDeleteThanks for dropping by FaAz and Soo.
ReplyDeleteSoo, yes i know them. Sure, add me.
added. tks ! in fact... i think u click like on the robber fly i took! tks alot !
ReplyDeleteWow! Creative, result very good.
ReplyDeleteThank you JJ.
ReplyDeletesaya mesti pilih...thanks for sharing this kurt san.
ReplyDeleteThanks metaroyal :)
ReplyDeletemade 1 of these today and the initiak results are promising , although the light was over shooting a little so i have changed the angle of the diffuser a touch . the best thing is the action freezing ability of the speedlight now allows me to shoot macro handheld which makes life a lot easier with bugs that wont keep still .
ReplyDeleteExactly!
DeleteSuper idee!!!
ReplyDeleteThank you, Oleg.
Delete